
I still remember the first time a client called me in a panic because their WordPress site had vanished. The homepage showed only an error screen, the admin login did not work, and years of blog posts, comments, and customer data seemed gone. The first thing they asked me was how to back up a WordPress site and why nobody had done it before things went wrong.
WordPress sites are easy targets for attacks and random failures. There are more than 4,000 ransomware attacks every single day, according to the FBI. It only takes one bad moment to lose years of work when you have plugin bugs, bad updates, or click on the wrong file accidentally. Without a solid WordPress backup strategy, there is no rewind button for a business website, no way to roll back when something breaks.
I have worked as a WordPress consultant since 2006, and I have seen both sides: the site owner who shrugs off backups and later pays dearly and the one who has a clean backup and is back online in under an hour. In this guide I share five real-life‑tested methods on how to backup your WordPress site that I have personally used and verified over the years. I walk through what to back up, when to back it up, where to store it, and how to restore your site if disaster hits. By the time you reach the end, you will know how to set up a complete, mostly automated backup system that quietly protects your WordPress investment in the background.
“There are two kinds of people: those who back up and those who have never lost everything.” — old sysadmin saying
What Is a WordPress Backup and Why You Need One
A WordPress backup is a full copy of your site at a single moment in time. It covers both the files and the database so you can roll the site back to that exact state. Think of it as a photo of your site that you can put back on the server whenever things go wrong.
When a site breaks, it usually happens fast. Outdated plugins, weak passwords, brute‑force attacks, server crashes, or someone deleting the wrong folder can all make a site unusable. For many small businesses this is not only a tech issue but also a money problem, because a good blog can bring in far more leads than a static brochure site. If that content disappears, the lost traffic and trust hurt real revenue.
Many people think their host has everything covered. Most hosts do run some kind of backup, but those copies often live on the same server, with short retention and little control over timing. If the whole server fails or the host has trouble, those backups may vanish with the site. I treat backups as a simple insurance policy. Once they are in place I sleep better, and so do my clients, because we know we can fix even the very bad days.
What to Back Up: The Two Core Components of Your WordPress Site
To make a real backup of your WordPress site, you need two parts. One part is the set of files on the server, and the other part is the database. If either one is missing, you cannot bring the site back fully.
1. WordPress Files – The Body of Your Site
public_html/
├── wp-admin/            (core - admin)
├── wp-includes/         (core)
├── wp-content/
│   ├── plugins/         (plugins)
│   ├── themes/          (themes)
│   └── uploads/         (media)
├── wp-config.php        (config)
└── .htaccess            (rules)
These are the items stored on your web server:
- WordPress core files (the main application)
- Plugins that add features
- Themes that control design
- The
wp-content/uploadsfolder with all your images and other media - Configuration files such as
wp-config.phpand.htaccess - Any custom PHP, JavaScript, or CSS you or your developer added
On many sites the files take up the most space, sometimes several gigabytes when there are many images or videos.
2. WordPress Database – The Brain and Memory
WordPress Database (MySQL/MariaDB)
├── wp_posts              (posts, pages, attachments, revisions)
├── wp_postmeta           (post/page metadata)
├── wp_comments           (comments)
├── wp_commentmeta        (comment metadata)
├── wp_users              (user accounts)
├── wp_usermeta           (user roles + user metadata)
├── wp_options            (site settings, menus, widgets, many plugin options)
├── wp_terms              (taxonomy terms)
├── wp_term_taxonomy      (term types: category, tag, custom taxonomies)
├── wp_term_relationships (links posts ↔ terms)
└── wp_*                  (plugin-created tables: settings + custom data)
The database holds almost everything that makes your site feel alive:
- Posts and pages
- Comments
- User accounts
- Site settings, menus, widgets, and options
- Many plugin settings and data
Databases are often smaller than the files, sometimes only a few dozen megabytes, but they hold the content and configuration that matter most.
If you only save the files, you keep the shell but lose the content. If you only save the database, you keep the words but lose the way they display. A complete backup always covers both files and the database so that the restored site looks and behaves the same as before.
Method 1: Using xCloud – The All-in-One WordPress Management Platform [Recommended]
After managing WordPress sites for nearly two decades, I’ve learned that the best backup solution isn’t just about copying files. It’s about having a complete management ecosystem that makes backups feel effortless. That’s why xCloud has become my top recommendation, especially for agencies managing multiple client sites and business owners who want professional-grade hosting without the complexity.
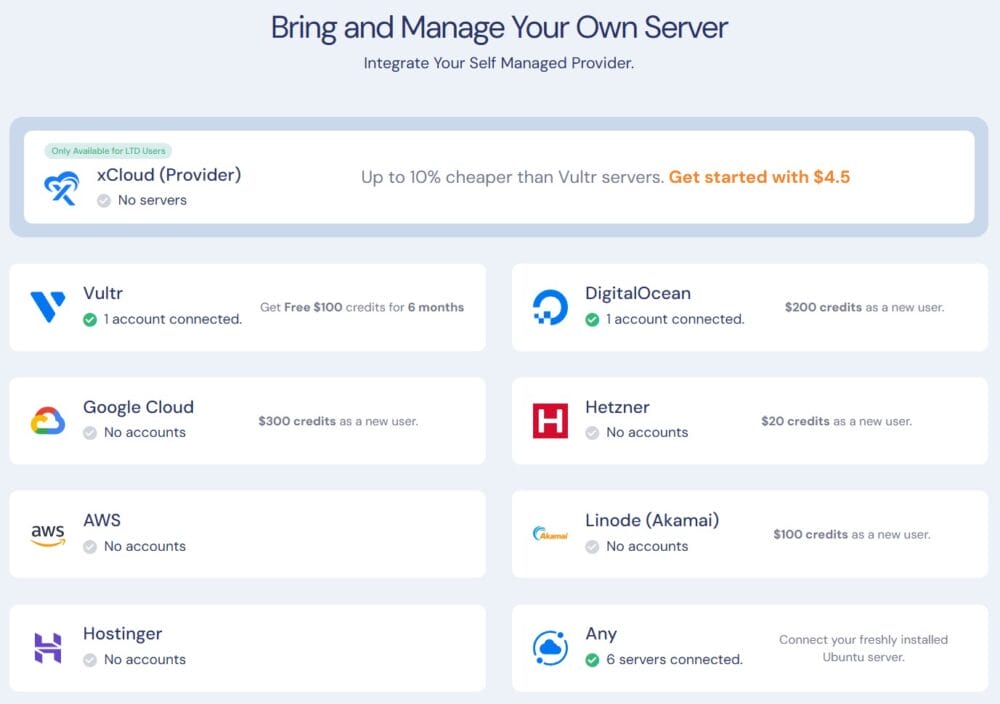
Unlike traditional backup plugins that bolt onto your existing setup, xCloud is a comprehensive WordPress hosting management panel that treats backups as one integrated piece of a larger workflow. You can use xCloud’s optimized managed hosting. Or your server from DigitalOcean, Vultr, AWS, Hetzner, Akamai, Hostlinger, Google Cloud, or your custom VPS, to get backups that are as good as those from an enterprise without the headaches that come with them.
Why xCloud Stands Out: Server-Level Performance
Here’s something most WordPress site owners don’t realize traditional backup plugins run inside WordPress itself, competing for the same CPU and RAM resources your site needs to serve visitors.
When you trigger a backup on a large site (especially one with thousands of images, substantial databases, or heavy traffic), plugin-based backups can spike resource usage to dangerous levels.
I’ve seen this scenario play out dozens of times: A client schedules automated backups during business hours. The backup plugin starts churning through gigabytes of files and database tables. Suddenly the site slows to a crawl, visitors see timeout errors, and in the worst cases, the backup process crashes before completing because the hosting account hits its memory limit. The site owner is left choosing between protecting their data and keeping their site responsive. That’s a choice nobody should have to make.
xCloud solves this fundamental problem by running backups as server-level scripts, completely outside the WordPress environment. The backup process operates independently at the system level, using dedicated server resources that don’t interfere with your WordPress application. Your site continues serving visitors at full speed while xCloud quietly handles backup operations in the background.
This architecture means:
- No resource contention – WordPress doesn’t compete with the backup process for CPU cycles or RAM
- Reliable completion – Large sites with 5 GB+ of files back up successfully every time without timeouts
- Traffic-hour safety – You can run backups during peak traffic without degrading visitor experience
- Faster execution – Server-level operations bypass WordPress’s PHP processing overhead for significantly faster backup speeds
- Lower failure rates – The backup process can’t be interrupted by PHP memory limits, execution timeouts, or WordPress crashes
For agencies managing client sites, this distinction is critical. When a backup runs during a traffic spike and doesn’t affect site performance at all, that’s the difference between professional-grade infrastructure and hoping a plugin doesn’t crash your client’s most profitable sales day.
What Makes xCloud Different
Beyond the server-level architecture, xCloud implements a “set it and forget it” philosophy combined with serious power under the hood. You’re not just getting backups. You’re getting automated security updates, performance optimization, staging environments, team collaboration tools, and seamless integrations with virtually any S3-compatible storage provider. For agencies juggling dozens of client sites, this consolidation alone saves hours every week.
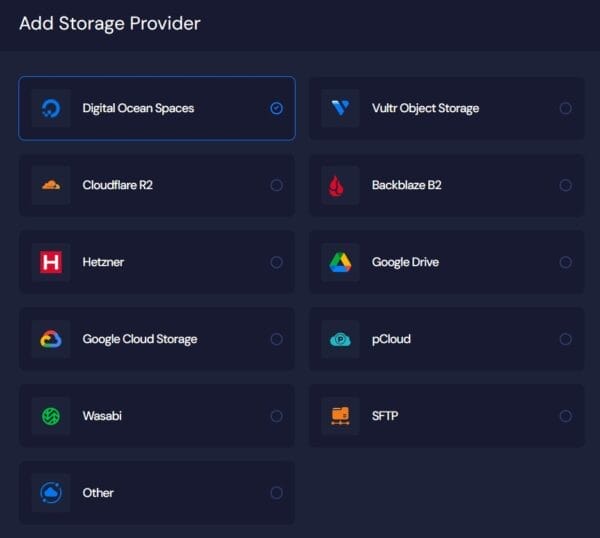
The backup system itself supports both incremental and full backups, connects to storage providers like Google Drive, pCloud, AWS S3, Digital Ocean Spaces, Vultr Object Storage, Cloudflare R2, iDrive e2, MinIO, Wasabi, Onidel and any generic S3-compatible destination. This flexibility means you can use storage you already pay for or choose the most cost-effective option for your needs.
Setting Up Automated Backups in xCloud
Here’s how I typically configure backups for a new site:
1. Connect Your Server (or Create One)
- If you’re bringing your server (VPS or dedicated), integrate it with xCloud by adding your provider’s SSH credentials. For providers like DigitalOcean, AWS, Vultr, Hetzner you can connect and deploy via API.
- If you’re starting fresh, spin up a new managed server directly through xCloud
- The free plan includes 1 server and up to 10 websites with no feature limitations, which is perfect for testing or small operations
2. Deploy or Connect Your WordPress Site
- Deploy a fresh WordPress site in minutes, or connect an existing site you’re migrating
- xCloud automatically configures the optimized LEMP or OpenLiteSpeed stack for maximum performance
3. Connect your storage provider if you haven’t already
- Create a connection to a storage provider like Google Drive, pCloud, AWS S3, Digital Ocean Spaces, Vultr Object Storage, Cloudflare R2, iDrive e2, MinIO, Wasabi, Onidel and any generic S3-compatible destination.
- Give it a name so you can identify it later
4. Configure Backup Settings (The “Set It and Forget It” Step)
- Navigate to your site’s settings in the xCloud dashboard
- Under the backup section, select:
- Target storage provider name – that you have made in step 3.
- Backup type (full site backup or database-only for quick snapshots before updates)
- Frequency (daily, weekly, or custom intervals based on your update schedule)
- Retention policy (automatically delete backups older than X days to manage storage costs)
- Save your settings and xCloud handles everything else automatically
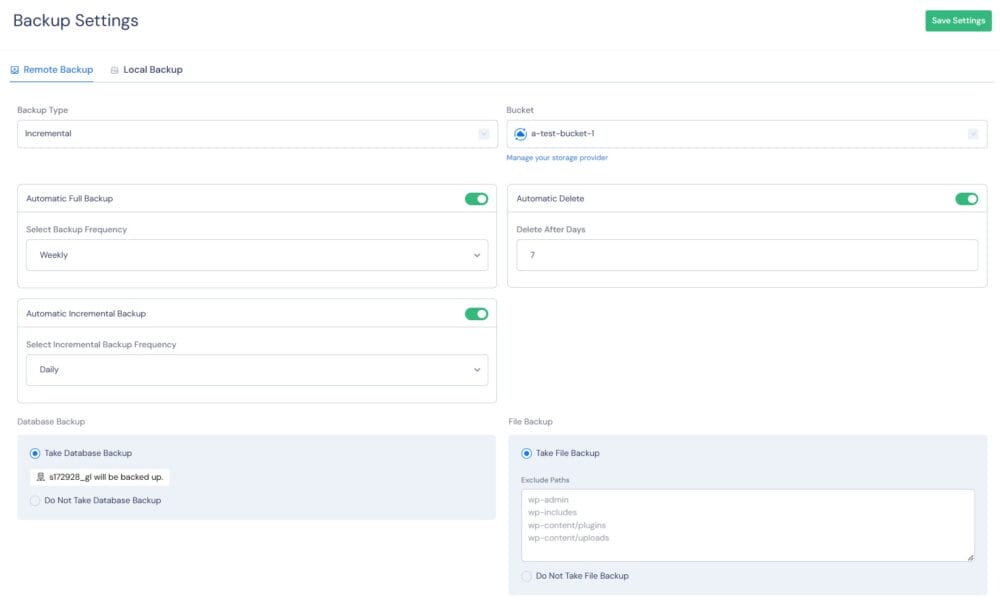
Because backups run at the server level through cron jobs rather than WordPress’s WP-Cron system, they execute precisely on schedule regardless of site traffic patterns. WordPress’s WP-Cron only triggers when someone visits your site, which can delay backups for hours or even days on low-traffic sites. xCloud’s server cron ensures your 2 AM backup runs at exactly 2 AM, whether your site had zero visitors or ten thousand.
4. Verify Your First Backup
- Within minutes of saving your settings, xCloud creates the first backup and uploads it to your chosen storage
- Check your storage provider (e.g., Google Drive folder or S3 bucket) to confirm the backup arrived
- You’ll see a dated backup file that includes both your site files and database
The Two-Click Restore Process
This is where xCloud truly shines. I’ve restored sites at 2 AM when a client’s developer accidentally deleted a critical file, and the process took less time than making coffee:
- Go to the Backups page in your site dashboard
- Browse your list of stored backups (sorted by date)
- Click the Restore button next to the backup you want
- Confirm the restore and xCloud handles the rest
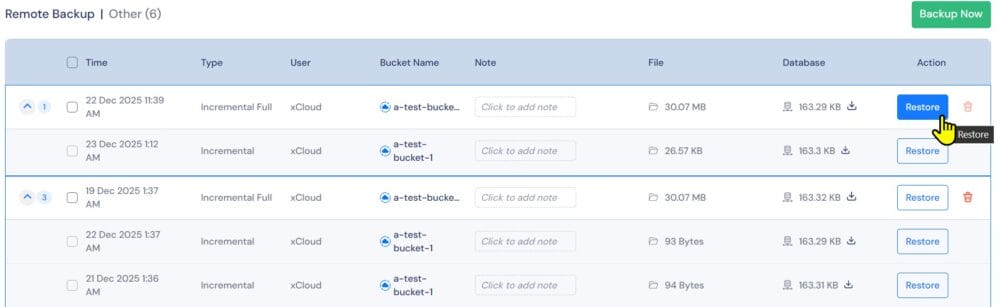
That’s it. No downloading massive ZIP files to your computer. No uploading through sluggish FTP connections. No installer scripts to run. xCloud pulls the backup from your storage, extracts it, and restores both files and the database directly on the server.
Even if your WordPress admin is completely inaccessible due to a plugin crash or theme conflict, you can still restore from the xCloud dashboard because it operates at the server level.
Perfect for Agencies and Growing Businesses
If you manage multiple client sites, xCloud’s team collaboration features let you add unlimited users with granular permissions. Your junior developer can deploy staging sites and run backups, while only senior staff can push changes to production or access client billing. The white-label option even lets agencies rebrand the entire client portal and run it as their hosting service.
For business owners, xCloud eliminates the “tech person” bottleneck. Your marketing team can clone a site for A/B testing, restore a backup after a bad plugin update, or deploy a staging environment for the web designer, all without touching a command line or calling an expensive consultant.
Pricing That Scales with You
xCloud follows a “bring your own infrastructure” model that’s refreshingly transparent. The free plan gives you 1 server and 10 websites with full features (no backup limitations, no storage caps, no hidden tiers). You only pay for the actual server costs from your chosen provider (usually $5 to $20 per month for a small business site) plus optional add-ons like their managed email service or security powered by Patchstack ($2/month).
This model is a big deal for agencies. If you buy server resources in bulk, you can charge your clients retail hosting fees, and xCloud’s infrastructure takes care of all the technical work that would normally need a full-time system administrator.
Security Beyond Backups
While we’re focused on backups here, it’s worth noting that xCloud treats security as a complete system:
- Automated security updates apply patches immediately when vulnerabilities are announced
- 7G/8G Web Application Firewall blocks common attacks like SQL injection and XSS
- Fail2Ban protection defends against brute-force attacks
- Site isolation keeps each website in its own system user, so a breach on one client site can’t spread to others
- Free SSL certificates with automatic renewal or directly attach Cloudflare via API. Or bring your custom SSL.
When a backup is your last line of defense, having these layers in front of it means you’ll rarely need to use that backup in the first place.
Real-World Example: The Middle-of-the-Night Crisis
Last month one of my agency clients had a WordPress site that suddenly started showing a white screen after a theme update. The developer who made the change was in a different timezone and unavailable. Instead of waiting or trying to debug PHP errors at midnight, I:
- Logged into xCloud
- Went to the site’s backup page
- Clicked restore on yesterday’s backup (taken automatically at 2 AM)
- Waited 3 minutes while xCloud pulled the backup from S3-compatible storage and restored it
The site was back online before I finished my first cup of coffee. The next morning the developer rolled back the theme update properly in a staging environment, tested it, and then pushed the fix to production. Total client downtime: under 5 minutes, and most of that was me finding my password manager.
Because the restore happened at the server level, it worked even though the WordPress admin panel was completely broken. A plugin-based backup solution would have been useless in that scenario. I couldn’t have accessed the WordPress dashboard to trigger a restore even if I wanted to.
When xCloud Makes the Most Sense
xCloud is ideal if you:
- Manage multiple WordPress sites and want one dashboard for everything
- Run large sites (5 GB+ files, substantial databases) where plugin backups struggle or fail
- Value automation over manual control (you want backups to happen without thinking about them)
- Need team access with different permission levels
- Want off-site backups to cloud storage without configuring complex sync tools
- Run an agency or hosting reseller business and need white-label capabilities
- Prefer a “bring your own server” model that keeps infrastructure costs transparent
- Need backups that won’t affect site performance during traffic spikes
It’s less suitable if you only have one small personal blog with minimal traffic, rarely update it, and prefer the simplicity of a standalone backup plugin. For that use case, the free version of a plugin like UpdraftPlus or WPVivid might feel lighter.
Getting Started
The fastest way to test xCloud risk-free:
- Sign up for the free plan at xCloud’s website (the self-managed-server tab)
- Connect a small development server (a $5/month DigitalOcean droplet works great)
- Deploy a test WordPress site
- Configure a backup to Google Drive or another free storage tier
- Break something intentionally (delete a plugin, change a setting)
- Restore the backup and watch how smooth the process feels
If you like what you see, scaling up to production sites and adding team members takes minutes. The learning curve is surprisingly gentle for a tool with this much power. xCloud clearly spent time on the interface, and it shows.
For agencies and serious business sites, xCloud represents the modern approach to WordPress management: treat hosting, backups, security, and performance as one integrated system rather than a collection of separate plugins and services. The server-level architecture means backups never compete with your site for resources, automated schedules run precisely on time, and restores work even when WordPress itself is broken.
It costs slightly more than cobbling together free tools, but the time savings, reliability, and reduced stress make it worth every penny, especially the first time you restore a critical client site in minutes instead of hours.
Method 2: Using Your Hosting Provider’s Backup System
Most good WordPress hosts offer some kind of built‑in backup feature. This can be an effortless safety net because it runs on the same platform that already powers the site. In many control panels there is a simple page where you can see daily restore points, often with one‑click restore buttons.
One host I often recommend for small and medium WordPress sites is Verpex with cPanel shared hosting. It brings free daily automated backups, DDoS protection, and a Litespeed web server, which gives a nice mix of speed and stability without complex setup. For a small business owner who just wants the site to stay online and safe, this kind of plug‑and‑play hosting removes much of the stress around backup planning.
To use host‑based backups, in this example I am just using the autobackup feature of cPanel:
- Log in to the hosting panel. Look for the JetBackup page.
- Open the Backup or Restore section.
- Pick a date from the available restore points.
- Choose whether to restore the whole account or only certain parts (files, database, or email).
- Download an archive to my local machine when the panel offers that option.
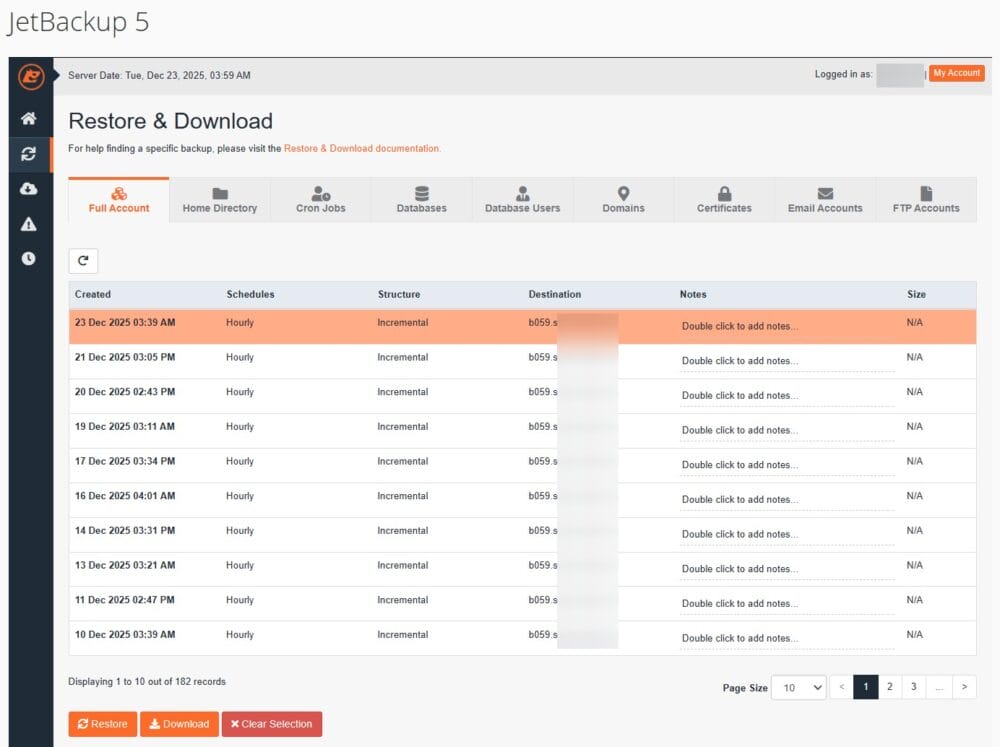
This is handy when I need a quick roll back after a bad update.
Host backups do have limits:
- Many providers keep only a short history, maybe seven to thirty days.
- Because the copies often live on the same physical server, a major server failure can take out both the site and its backups.
- You usually have little control over the run time or structure of these backups.
That is why I treat host backups as a second line of defense instead of the only one, and I try to follow the 3‑2‑1 rule with at least one copy stored outside the hosting environment.
Method 3: Manual Backups Via FTP and phpMyAdmin
Manual backups give full control over what you copy and where you store it. This method is popular with developers and power users, and it can be useful when plugins are not allowed or when you need a one‑time archive before a risky change. The tradeoff is that it takes more time and discipline, and there is more room for simple mistakes.
A. Back Up The Files
I often use an FTP client such as FileZilla:
- Connect with the server host name, username, password, and FTP or SFTP port.
- Open the root folder for the site, often called
public_htmlor named after the domain. - Select all WordPress folders and files, including:
wp-adminwp-contentwp-includeswp-config.php- Any other custom folders or files
- Download everything to a folder on my computer and wait for the transfer to complete, which can take a while for media‑heavy sites.
Another way is to use the File Manager inside the hosting panel:
- Open the file tool and go into the root folder.
- Select all files and use the Compress function to create a single ZIP archive.
- After the archive is ready, download that one file to your computer.
This approach is often faster and less error‑prone than many small FTP transfers, especially on slower connections.
B. Back Up the Database
For the database backup I use phpMyAdmin, which is available in most panels:
- Open phpMyAdmin.
- Click the database that matches the site.
- Go to the Export tab.
- For simple backups, use the Quick export option with SQL format.
- For more control, choose Custom export, make sure all tables are marked, keep the SQL format, and turn on the option that adds
DROP TABLEcommands. This helps when restoring into an existing database. - Start the export and save the resulting
.sqlfile next to the file backup.
Manual backups are powerful, but they come with some clear challenges:
- There is no automatic schedule unless you script it yourself, so it is easy to forget regular copies.
- Large sites can take a long time to download.
- Missing even one important file or table can break a restore.
For those reasons I usually keep manual methods for special cases, such as before large upgrades, and rely on automated tools for day‑to‑day protection.
Method 4: Cloud-Based Backup Services
Cloud‑based backup services focus only on backing up and restoring websites. They run their infrastructure with separate storage, monitoring, and support teams. This kind of service makes sense when a site brings in serious revenue and downtime or data loss is not acceptable.
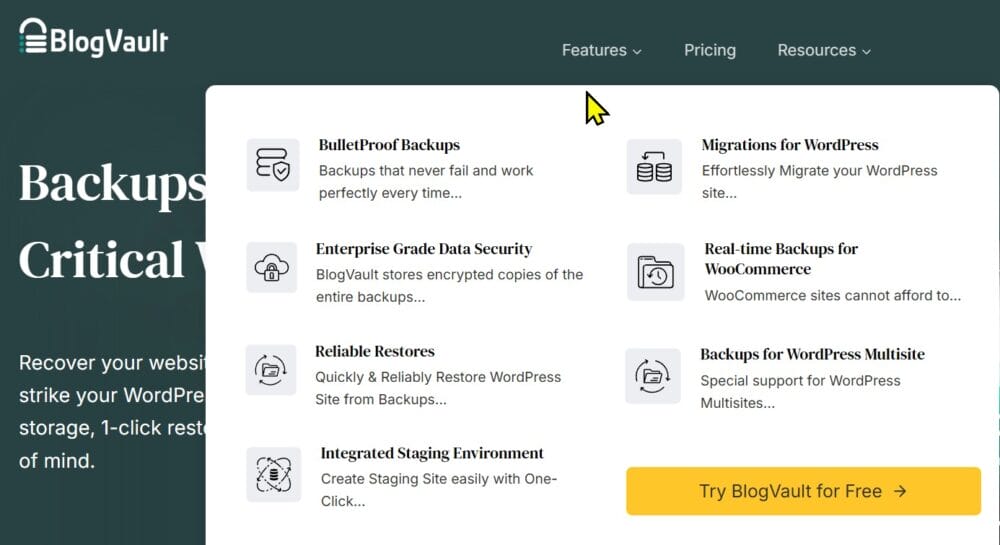
Well‑known names here include BlogVault, VaultPress from Jetpack, CodeGuard, and ManageWP. These services connect to the WordPress site through a plugin or an API key, then copy data to their own servers. Many of them use incremental backups, which means they only copy changes after the first full backup. That keeps backups fast and light, even for larger sites.
The main strengths of these services are:
- Backups live on remote cloud systems, often with several layers of redundancy.
- Traffic between your site and the service is usually encrypted.
- Many providers watch the backup process and send alerts when a run fails so you can act quickly.
- Some tools offer staging areas where you can restore a backup and test changes before touching the live site.
The clear tradeoff is price. These tools often charge a monthly or yearly fee per site, which can feel high for a hobby blog but very fair for an online store or membership site. When a website is a key part of a business, spending more on a managed backup provider is often cheaper than even a single day of heavy downtime.
Method 5: Outsourcing to a WordPress Maintenance Service
For many founders and business owners, the best answer to how to back up a WordPress site is simple: they would rather not do it themselves at all. They want someone they trust to handle it for them. That is where WordPress maintenance services come in.
These services usually bundle backups with other ongoing care. A typical plan includes:
- Automated backups stored off-site
- Uptime monitoring with alerts
- Regular updates for core files, themes, and plugins
- Security checks and malware cleanup if needed
- Performance tuning and basic optimization
- A person to step in and restore the site when something serious happens
My Approach After Nearly 20 Years of WordPress Maintenance
I have been managing WordPress hosting, maintenance, and security tuning since 2006, and I have learned that the real value of a maintenance service goes beyond just running backups. It is about giving business owners genuine peace of mind so they can focus on what actually grows their company.
In my practice, I do not just set up automated backups and disappear. I provide regular reports for each client showing exactly what happened with their site that month: which backups ran successfully, what updates were applied, any security scans performed, and performance metrics. These reports create transparency and accountability. My clients know their site is being watched, and they have documentation to show stakeholders or investors that their digital assets are professionally protected.
When a client gets a clear monthly report showing 30 successful daily backups, zero security threats detected, and all plugins kept current, that is when they truly relax. They are not wondering “did the backup actually run?” or “is my site vulnerable?” They have answers in a simple document they can review in five minutes.
Why This Model Works
From what I have seen since the early 2000s, this path fits businesses where time is better spent on marketing, sales, and product work rather than server chores. It also helps when a site directly brings in money, because any downtime feels painful.
My nearly two decades of experience in WordPress hosting, maintenance, and security tuning means I have seen virtually every failure scenario: corrupted databases, hacked admin accounts, bad plugin updates that break checkout pages, hosting migrations gone wrong, and server crashes at the worst possible times. That pattern recognition lets me spot problems before they become emergencies and restore sites quickly when prevention is not enough.
Investment and Value
Prices vary, but many services start around fifty dollars a month and go up based on how many sites and what level of support you want. One saved disaster often covers months of fees, which is why I often nudge busy clients toward this hands-off approach.
For business owners who value their time at a hundred dollars an hour or more, spending fifty to two hundred dollars monthly for professional WordPress maintenance is an easy decision. The alternative is either learning enough about servers, PHP, databases, and security to do it yourself (dozens of hours), or gambling that nothing will go wrong and facing a much larger bill when it inevitably does.
When to Choose Professional Maintenance
This method makes the most sense if you:
- Run a business site that generates revenue or leads
- Lack technical experience with servers and WordPress internals
- Want detailed reporting and accountability, not just “set and forget” automation
- Value your time more than the monthly service fee
- Need someone available when emergencies happen outside business hours
- Manage multiple sites and want consistent care across all of them
Want Someone to Handle All of This for You?
If you’d rather focus on growing your business instead of managing backups, security updates, and server configurations, I can help. With nearly two decades of experience in WordPress hosting, maintenance, and security tuning, I offer comprehensive maintenance plan subscriptions that take all the technical headaches off your plate.
My maintenance plans include:
- Automated daily backups to multiple secure locations
- Proactive security monitoring and immediate threat response
- Regular updates for WordPress core, plugins, and themes
- Performance optimization to keep your site fast
- Monthly detailed reports showing exactly what was done and when
- Priority support when you need help or have questions
- Emergency restore services available with 2-4 hours turnaround time
You don’t need to understand servers, databases, or backup protocols. You just need to know your site is protected by someone who’s seen virtually every failure scenario over two decades and knows how to prevent them. My clients sleep well at night because they get clear monthly reports proving their site is professionally protected, and they have my direct contact when emergencies happen.
How to Restore Your WordPress Site from a Backup
A backup only has real value when you can restore it with confidence. The restore steps depend on how you created the backup, but the idea is always the same: you put the correct files and database back in place, then point WordPress to them.
Restoring an xCloud Backup
This is where xCloud truly shines with its two-click restore process that works even when your WordPress admin panel is completely broken:
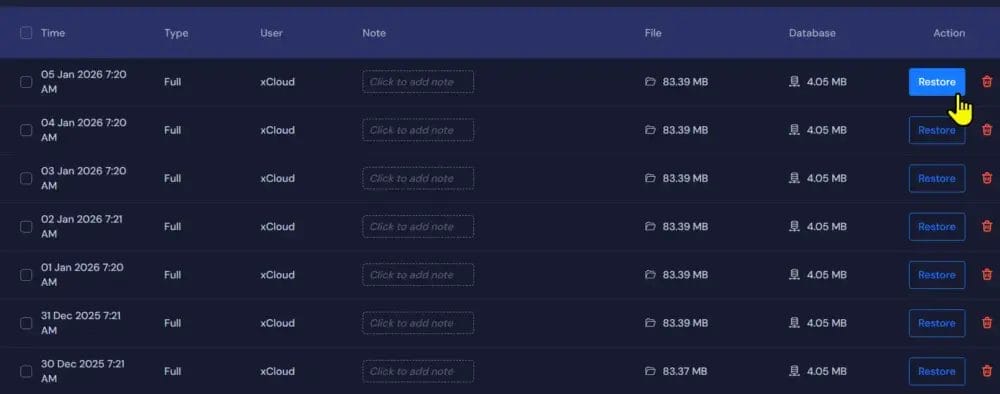
- Log into your xCloud dashboard (not your WordPress admin, since that might be inaccessible)
- Navigate to the Backups page for the affected site
- Browse your list of stored backups sorted by date and time
- Click the Restore button next to the backup you want to use
- Confirm the restore and xCloud handles everything else automatically
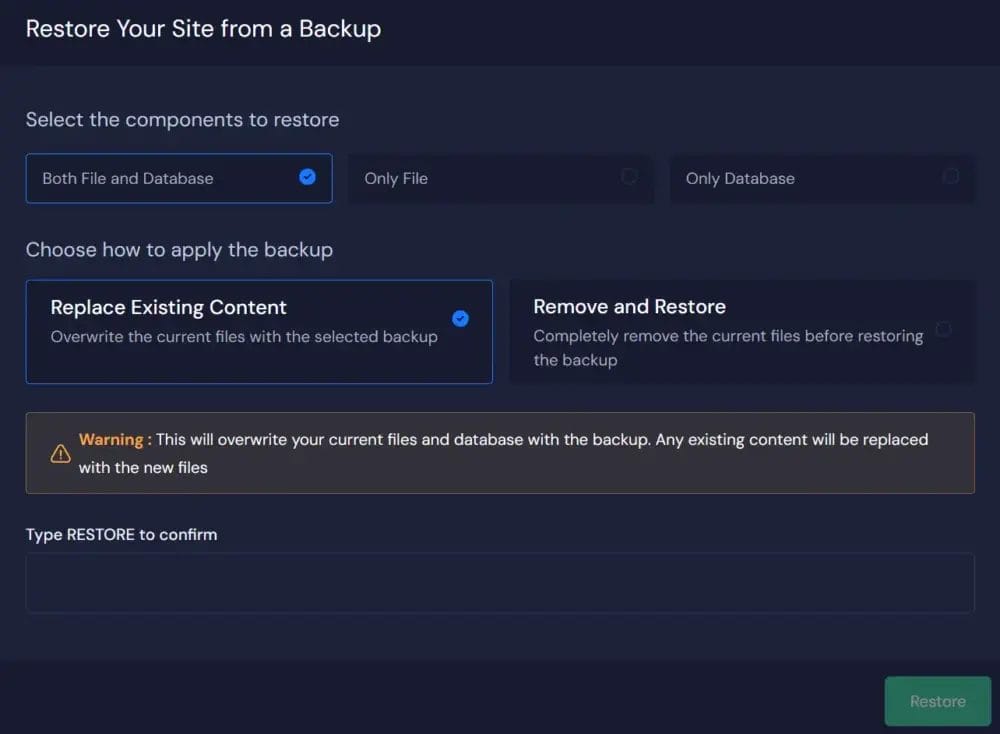
xCloud pulls the backup from your chosen storage provider (Google Drive, AWS S3, pCloud, or any S3-compatible destination), extracts both files and database, and restores them directly on the server. The entire process typically completes in 3 to 5 minutes for most sites, regardless of size.
Because xCloud operates at the server level rather than through WordPress, you can restore a site even when:
- The WordPress admin panel shows white screens or fatal errors
- Plugins have crashed the site completely
- Theme conflicts make the dashboard inaccessible
- Database corruption prevents normal WordPress loading
Often, I go from a completely broken site to a working site in under five minutes, which is why I keep xCloud as my primary restore method for all business-critical sites.
Restoring From UpdraftPlus Backup (Also applies to WPVivid)
UpdraftPlus offers straightforward restore options directly from your WordPress admin (when it’s accessible):
From Within WordPress:
- Go to Settings → UpdraftPlus Backups in your WordPress admin
- Find the backup you want to restore in the “Existing Backups” section
- Click the Restore button for that backup
- Select which components to restore:
- Plugins
- Themes
- Uploads (images and media)
- Database
- Other WordPress files
- Click Restore and wait while UpdraftPlus downloads the backup from cloud storage and restores each component
- Review the restore report to confirm everything completed successfully
The process typically takes 5 to 20 minutes depending on site size and your internet connection speed.
If WordPress Admin Is Broken:
If your WordPress dashboard won’t load, UpdraftPlus Premium offers a separate restore tool:
- Download the backup files from your cloud storage (Dropbox, Google Drive, etc.) to your computer
- Use FTP to upload the
updraftplusdirectory towp-contentif it’s missing - Run the UpdraftPlus restore script by accessing it directly via browser
- Follow the restoration wizard to rebuild your site
For most small to medium sites (under 5 GB), UpdraftPlus restores work reliably. For larger sites or when WordPress itself is badly broken, server-level solutions like xCloud provide more reliable recovery.
Restoring From Host Backups
Host-based restores are the quickest option when you only need to roll back a few hours or days:
- Log into your hosting control panel (cPanel, Plesk, or custom dashboard)
- Open the backup or restore section (often labeled “Backups,” “Site Backup,” or “Restore”)
- Choose the backup date you want to restore from
- Select what to restore:
- Full account (files + database)
- Files only
- Database only
- Confirm the action and the host runs the process in the background
- Wait a few minutes while the system replaces current files/database with the backup version
- Verify your site is back to the chosen state
With hosts like Verpex or Racknerd, this entire process often takes under 10 minutes. The limitation is that you can only restore to dates when the host created backups (usually daily), and you have less control over exactly what gets restored.
This method is very direct but offers less fine-grained control. I use host restores for quick rollbacks after bad plugin updates or minor mistakes, but never rely on them as the only backup method.
Restoring From Manual Backups
Manual restores require more steps and technical confidence, but they work when nothing else does:
1. Restore the Files:
- Connect to your server via FTP or File Manager
- Navigate to your WordPress installation directory (usually
public_htmlorwww) - Delete the current broken files (or rename the folder to
public_html_brokenas a safety measure) - Upload your backed-up files from your local computer or download location
- Ensure file permissions are correct (folders 755, files 644)
2. Restore the Database:
- Log into phpMyAdmin through your hosting control panel
- Select the WordPress database (check
wp-config.phpif you’re not sure which one) - Click the “Operations” tab and choose “Drop all tables” (or manually select and drop existing tables)
- Go to the “Import” tab
- Choose your SQL backup file and click “Go”
- Wait while phpMyAdmin rebuilds all database tables from your backup
3. Update Configuration If Needed:
- If database names, usernames, or passwords changed, update the wp-config.php with the correct credentials
- If you’re restoring to a different domain or server path, use a search-and-replace tool like WP-CLI or the Better Search Replace plugin to update all URLs in the database
4. Clear Caches:
- Delete any caching plugin caches
- Clear your browser cache
- Visit your site to confirm everything works
Manual restores typically take 20 to 60 minutes depending on site size and your comfort level with FTP and databases. I keep detailed notes for each site I manage so that during a real crisis I can follow a clear checklist instead of trying to remember every step under pressure.
Practice Makes Perfect
Whatever method you use, I strongly recommend testing restores on a staging copy or development environment at least once before you actually need it in an emergency. The middle of a crisis at 2 AM is not the time to discover that your backup files are corrupted, your FTP password doesn’t work, or you’re not sure which database to import.
Create a test restore checklist for each backup method you use:
- Where are the backup files stored?
- What credentials do I need (FTP, database, control panel)?
- How long does a typical restore take?
- What verification steps confirm the restore worked?
“Everything fails, all the time.” — Werner Vogels, CTO at Amazon
That quote sums up why practicing restores is just as important as making the backups themselves. The backup that sits untested in cloud storage isn’t insurance, it’s just files. The backup you’ve successfully restored at least once? That’s real protection.
Best Practices for WordPress Backup Storage
Good storage habits matter as much as making the backup in the first place. A backup that lives only on the same server as your site is vulnerable to the same power cuts, hardware failures, and security issues.
I like to follow the 3‑2‑1 rule:
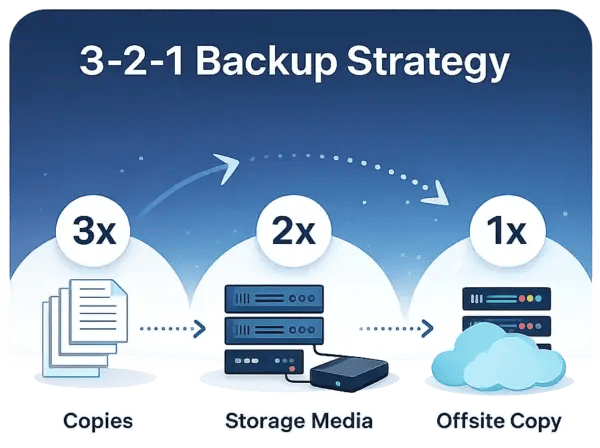
- 3 copies of your data
- The live site
- At least two separate backups
- 2 different types of storage
- For example, web server + cloud drive, or cloud drive + external disk
- 1 copy off‑site
- Away from your main server or office
For a WordPress site that might mean:
- The live site itself
- A backup sent to a cloud drive such as Google Drive, Dropbox, Amazon S3, or FTP
- Another copy on an external hard drive or a simple network storage box in the office
Retention policy is another key part. Problems do not always show up right away; a hidden hack or subtle bug can sit for days before anyone notices. This is why I prefer to keep several versions, not just the latest one. A common pattern is:
- Daily backups for a week
- Weekly backups for a month
- Monthly backups for a few more months
You can adjust this to match how often the site changes and how much storage is available.
Because backups often contain user data and internal information, I treat them like I treat passwords:
- Encrypt archives whenever possible
- Use strong passwords on cloud accounts
- Turn on two‑factor logins
- Limit who can see or download backup files
A backup should save you from trouble, not become a new risk on its own.
How Often Should You Back Up Your WordPress Site
The right backup frequency depends on how often things change on the site. Additional modifications mean more frequent backups, since every gap leaves room for lost data.
Here is a simple guideline:
- Online stores and membership sites
- Daily backups at minimum
- Real‑time or hourly backups when tools support it
- Active blogs and news sites
- Daily copies to capture new posts, comments, and tweaks
- Standard business sites with occasional updates
- Weekly backups are often enough
- Simple portfolio or brochure sites
- Weekly or twice‑monthly runs can work if content rarely changes
No matter what schedule I pick, I always create an extra manual backup right before major theme changes, big plugin updates, or WordPress core upgrades. Storage is cheap compared to the value of orders, contacts, and content, so when I am not sure, I choose more backups, not fewer.
Conclusion
WordPress backups are not a nice-to-have item on a long tech checklist. They are basic insurance for any site that matters to a business or a personal brand. Attacks, bugs, and human mistakes are part of the web, but data loss does not have to be.
In this guide I walked through five proven methods for keeping a WordPress site safe:
- xCloud as my first choice for agencies, business sites, and anyone managing multiple WordPress installations. Its server-level backup architecture means backups never compete with your site for resources, automated schedules run precisely on time, and two-click restores work even when WordPress itself is broken. The free plan (1 server, 10 sites) with bring-your-own-server flexibility makes it accessible for testing, while the full platform scales beautifully for professional operations.
- UpdraftPlus, WPVivid for smaller sites and solo site owners who want a reliable plugin-based solution with excellent cloud storage integrations. The free version handles basic backup and restore tasks well, while the premium version adds migration tools, incremental backups, and priority support. It’s the sweet spot for sites under 5 GB that don’t need server-level infrastructure.
- Host-based backups such as Verpex as a crucial second safety layer. These automated daily backups cost nothing extra, live in a different location from your main site, and provide quick rollback options when minor issues happen. Never rely on host backups alone but always keep them running alongside your primary backup method.
- Manual FTP and phpMyAdmin backups for full control when needed, emergencies, or learning exactly how WordPress backup mechanics work under the hood.
- Full maintenance plans for owners who would rather have experts handle the work, including regular reporting for peace of mind and nearly two decades of WordPress hosting and security expertise standing behind each backup.
The best method is the one that runs regularly and that you know how to restore. The size of your site matters more than most people realize. Plugin-based backups work beautifully for smaller WordPress installations (under 5 GB), but as your site grows with more content, images, and traffic, server-level solutions like xCloud become essential. Plugin backups that run inside WordPress start timing out, crashing, or slowing down your site during backup windows once you cross certain size thresholds. If you’re experiencing backup failures or notice performance dips when backups run, that’s your signal to upgrade to server-level infrastructure.
Do not wait for a failure to test how to back up a WordPress site and bring it back. Pick one of these approaches now, make your first backup, and practice a restore on a safe copy or staging environment. Test it while everything works so you know exactly what to do when something breaks at 2 AM. Once that is done, you can focus on growing the site, knowing that you have a solid safety net in place.
For agencies and serious business sites, the modern approach is treating hosting, backups, security, and performance as one integrated system rather than a collection of separate plugins and services. That’s where solutions like xCloud shine, because backups become just one piece of a complete management workflow that saves hours every week while protecting what matters most.
FAQs
How Long Does a WordPress Backup Take?
Backup time depends on site size, server speed, and the method you use. Small sites under one gigabyte can often finish in two to ten minutes on a decent host. Medium sites in the one to five-gigabyte range often need ten to thirty minutes. Large sites above that size can take from half an hour to a few hours, especially when copied over slower connections.
Server-level backup solutions like xCloud handle large sites much more efficiently because they operate outside WordPress and don’t compete for the same resources your site needs. Plugin-based backups that run inside WordPress tend to be slower and less reliable on larger sites, while incremental methods that only save changed files are faster than full manual copies.
Can I Back Up My WordPress Site for Free?
It is possible to back up a WordPress site without paying extra money. Free plugins such as Duplicator Lite or the free tier of UpdraftPlus, manual FTP and phpMyAdmin exports, and free daily backups from some hosts all fall into this group.
xCloud also offers a free plan that includes 1 server and up to 10 websites with full backup features, no storage caps, and no hidden limitations. You only pay for your actual server and backup destination costs from your chosen provider (usually $5 to $20 per month).
The tradeoff with most free tools is that they often have limits on:
- How often you can run backups
- How much cloud storage you get
- What kind of support is available when things go wrong
- Reliability on larger sites (plugin-based solutions struggle with sites over 5 GB due to resource constraints)
For business sites I usually suggest a modest yearly budget for a paid plugin or service, while using a host like Racknerd with free daily copies as a helpful middle ground. For agencies or sites with substantial traffic and content, server-level solutions like xCloud provide more reliable protection.
What Is the Difference Between a Backup and a Snapshot?
These two words sound similar but they mean different things in many hosting setups.
- A backup is a complete, portable copy of your files and database that you can download, move to another server, and restore there.
- A snapshot often refers to a point-in-time state of an entire server or virtual machine, created by the hosting platform.
Snapshots are quick to make and restore, but they are closely tied to that hosting system and are less convenient to move. For most WordPress owners, focusing on regular backups offers more long-term safety and flexibility than relying solely on snapshots.
Do WordPress Backups Slow Down My Website?
This depends entirely on how and where the backup runs.
Plugin-based backups that run inside WordPress can significantly impact site performance, especially on larger sites. When a backup plugin processes gigabytes of files and database tables, it competes with WordPress for CPU and RAM resources. This can cause your site to slow down, show timeout errors to visitors, or even crash during high-traffic periods. Plugin-based backups are generally only reliable for smaller sites (under 5 GB) with modest traffic.
Server-level backup solutions like xCloud solve this problem by running backups as independent server scripts completely outside the WordPress environment. The backup process uses dedicated server resources that don’t interfere with your site, meaning your visitors experience zero slowdown even during peak traffic hours while backups run in the background.
To reduce any impact with plugin-based backups:
- Schedule backups during quieter periods or steady-traffic windows
- Use plugins that support incremental backups, which copy only changed files
- Consider upgrading to server-level backup solutions if your site is large or business-critical
Modern server-level tools, set up carefully, usually have almost no visible impact on the front end regardless of site size or traffic.
Can I Restore My WordPress Site to a Different Domain or Server?
Yes, and this is one of the most helpful uses of backups beyond pure disaster recovery. Plugins such as Duplicator Pro or WPVivid are built to take a backup from one place and restore it on a new host or under a new domain name while handling URL and path changes for you. This makes it easy to move from staging to live, switch hosting providers, rename a brand, or create a development copy for testing.
xCloud makes migration even simpler with its two-click restore process that works at the server level. You can restore backups from cloud storage (Google Drive, AWS S3, pCloud, or any S3-compatible destination) directly to the same server or a completely different one. Because xCloud operates outside WordPress, you can restore a site even when the WordPress admin panel is completely broken or inaccessible.
Even if you restore by hand, you can still switch to a different server. With just a few clicks, xCloud can copy any site to a new domain and move the databases and files that need to be moved.
Are Plugin-Based Backups Reliable for All Site Sizes?
Plugin-based backups work well for smaller sites (typically under 5 GB with moderate traffic), but they become increasingly unreliable as sites grow larger. This is because backup plugins run inside WordPress and compete for the same CPU and RAM resources your site needs to serve visitors.
On larger sites with thousands of images, substantial databases, or heavy traffic, plugin-based backups often:
- Time out before completing due to PHP execution limits
- Crash when they hit hosting account memory limits
- Spike resource usage and slow down or crash your site during backup
- Fail silently, leaving you without protection
For larger sites, business-critical sites, or high-traffic sites, server-level backup solutions like xCloud (Method 1) are far more reliable. These run backups as independent server scripts outside WordPress, ensuring consistent completion regardless of site size, traffic patterns, or hosting resource constraints.
If your site is growing and you notice backup failures, timeouts, or performance issues during backup windows, that’s a clear sign to upgrade from plugin-based solutions to server-level backup infrastructure.
I can help in mapping out a plan for your backup needs depending on your site. As I have went through almost all of it. Just use the button below and reach out to me for a practical no BS long-term solution.